Buildings
The Buildings page serves as the central hub for managing all property-related information and operations.
Further Reading:
Overview
The Buildings page provides comprehensive tools for:
Managing Building information and building-level billing
Writing checks and journals and tracking financial data
Indexing Residents and related transactions
Communicating with Residents and the Board
Maintenance requests
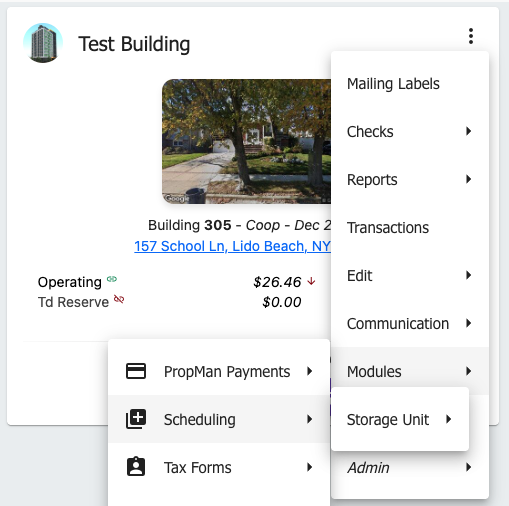
Building Cards
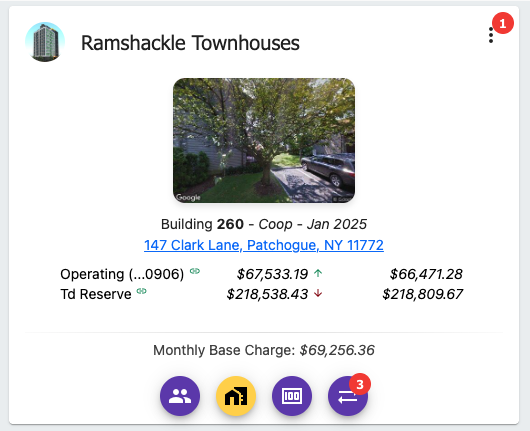
A Building card
Building Card Basics
Each Building under management is represented by a card with the following information
The Building Name
A dropdown menu with a host of additional actions
An image of the building automatically fetched from Google Street View
The Building account, type, and fiscal start
Address and link to Google Maps
Capital Accounts with book and bank balances
The monthly base charge amount
Quick Action buttons
Capital Accounts
Capital Accounts are the accounts that are used to track the financial activity of the Building.
Every Building is required to have at least one Capital Account, the Operating Account, and may have additional accounts such as Reserve Accounts.

Capital Accounts section of a Building card
Capital Accounts can be managed on the Edit Building screen, Capital Accounts section.
Each account is listed with description, book balance, and bank balance
Colored icons provide a quick visual indicator of bank linkage status and reconciliation status
Next to the Description is a colored icon indicating the bank linkage status
Green chain link - Bank Account is linked
Red chain link - Bank Account is not linked
Yellow chain link - Bank Account is linked, but PropMan Payments setup is incomplete
Next to the Book Balance is a colored icon indicating the live reconciliation status
Green checkmark - Reconciled, book balance and bank balance are equal
Green up arrow - Not reconciled, book balance is greater than bank balance
Red down arrow - Not reconciled, book balance is less than bank balance
When the Operating Account is not linked, the red link icon is clickable and will open the Plaid Linkage screen.
Quick Action Buttons

Quick Action Buttons at the bottom of a Building card
Each building card has a set of quick action buttons at the bottom of the card.
Residents - Navigate to the Residents page with the Building pre-selected
Assessments & Additional Charges - View and edit Assessments & Additional Charges
The color of the button indicates the status of the building’s assessments and additional charges
Purple - No Assessments or Additional Charges
Yellow - There exist Assessments and/or Additional Charges for this building
Write a Check - Write a check on behalf of the building. See Writing Checks.
Manage Auto-Reconciliation / Journals - Manage the auto-reconciliation engine & create Journals
If a numbered badge is present, it indicates that there are bank transactions tagged by the auto-reconciliation engine requiring approval
If no badge is present, clicking the button will open the new Journal screen
Note
The auto-reconciliation engine is a powerful tool that can be used to automatically reconcile bank transactions with the building’s bank accounts. It uses machine learning to identify transactions and tag the appropriate GL Accounts.
Management Building
A Management Building is a Building Card that is not a property. It is the Management business, and allows for Management to use the system to manage their own business, write checks, and run reports. This feature can be enabled or disabled by an Admin.
Note
The set of features available to a Management Building are more limited than those available to a property.
Edit Building
The Edit Building screen allows for the editing of Building information.
To open the Edit Building screen, click Edit Building in the dropdown menu of the Building card.
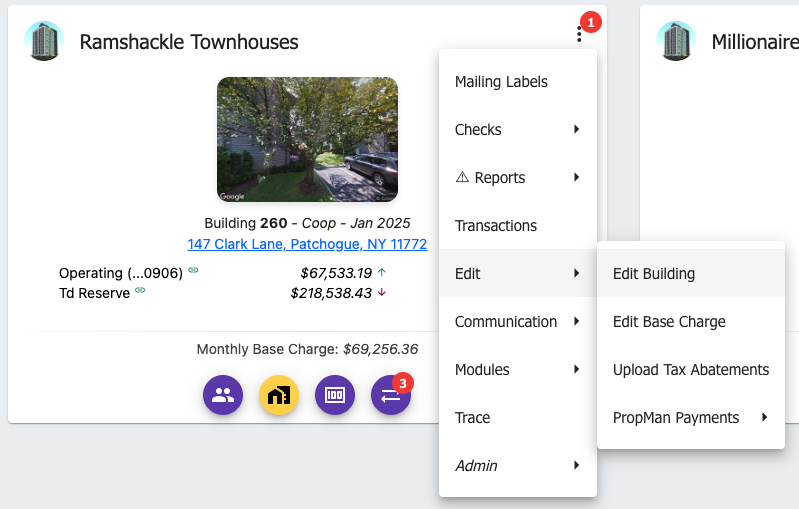
Dropdown Menu Dialog
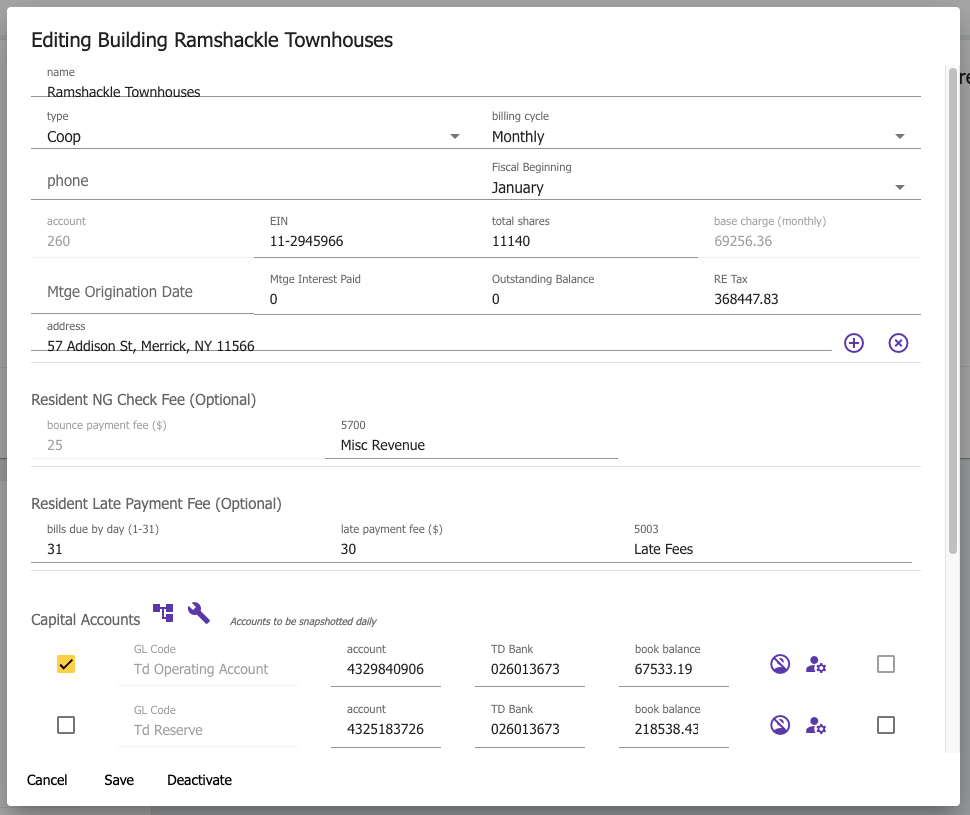
Edit Building Screen
The Cancel and Save buttons on the bottom of the screen save changes or cancel and close.
The Deactivate button on the bottom of the screen sets the building state to Deactivated.
Building States
All Buildings are in one of three states:
Active - The Building is active and all features are available
Deactivated - The Building is no longer managed but billing still runs and is processed
Deactivated state is useful while transitioning a Building to new Management, and Residents may still accidentally pay you. Be a good citizen and process billing and payments.
Inactive - The Building is completely disabled and removed from the home screen, but records are maintained
Building Attributes
Name - The name of the Building
Type - The type of Building: Condo, Co-op, Townhouses, Rental
Management Buildings are enabled or disabled by an Admin.
Billing Cycle - The billing cycle for the Building: Monthly, Quarterly, Annual
Phone - The phone number of the Building
Fiscal Beginning - The fiscal beginning month
Account - The account number of the Building
All Residents in the Buildings will be assigned account numbers starting with the Building’s account number. If the Building account number is 305, a Resident’s account number may be 305-002, etc.
EIN - The Employer Identification Number of the Building
The Building’s EIN is required for various functions within the system
Integration with Plaid for auto-reconciliation of bank transactions, and PropMan Payments, for online billpay, require an EIN
Buildings are a 1098 entity, and the EIN is required for tax reporting, specifically in the case of a Coop.
Total Shares - The total number of shares in the Building, used to split charges among Residents
Base Charge - The base charge amount for the Building
The base charge is the amount to be split and charged to each Resident each month, quarter, or year, depending on the Building’s billing cycle
Capital Accounts - The Capital/Bank Accounts to track for the Building
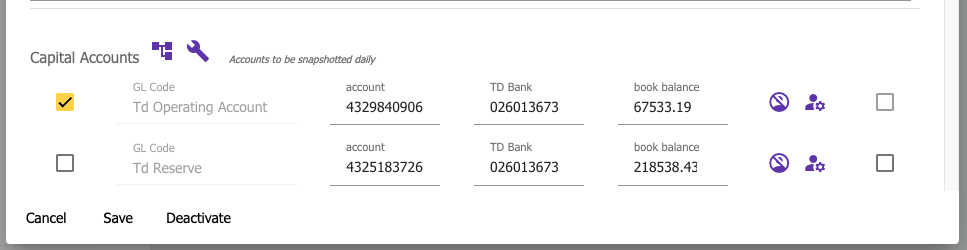
Capital Accounts section of the Edit Building screen
A flag indicating if the Capital Account is the operating account
GL Account associated with the Capital Account
The bank account number and routing number for the Capital Account
The account’s current book balance
Buttons and icons indicating how the bank balance is being tracked and linkage status
PropMan integrates with Plaid to pull live account balances and transactions
A checkbox to mark the Capital Account for deletion
Building Budget - Manage the budget for the Building used in the Budget & Cashflow Report
Building Modules/Features - Provide additional features that can be optionally enabled for a Building

Edit Building Screen, scrolled down
Building Budget
The Building Budget is used in the Budget & Cashflow Report. The budgeting process is done offline by Management and the Building and then uploaded to PropMan. Budgets are simple key-value pairs, where the key is a GL Code, and the value is the annual budget amount.
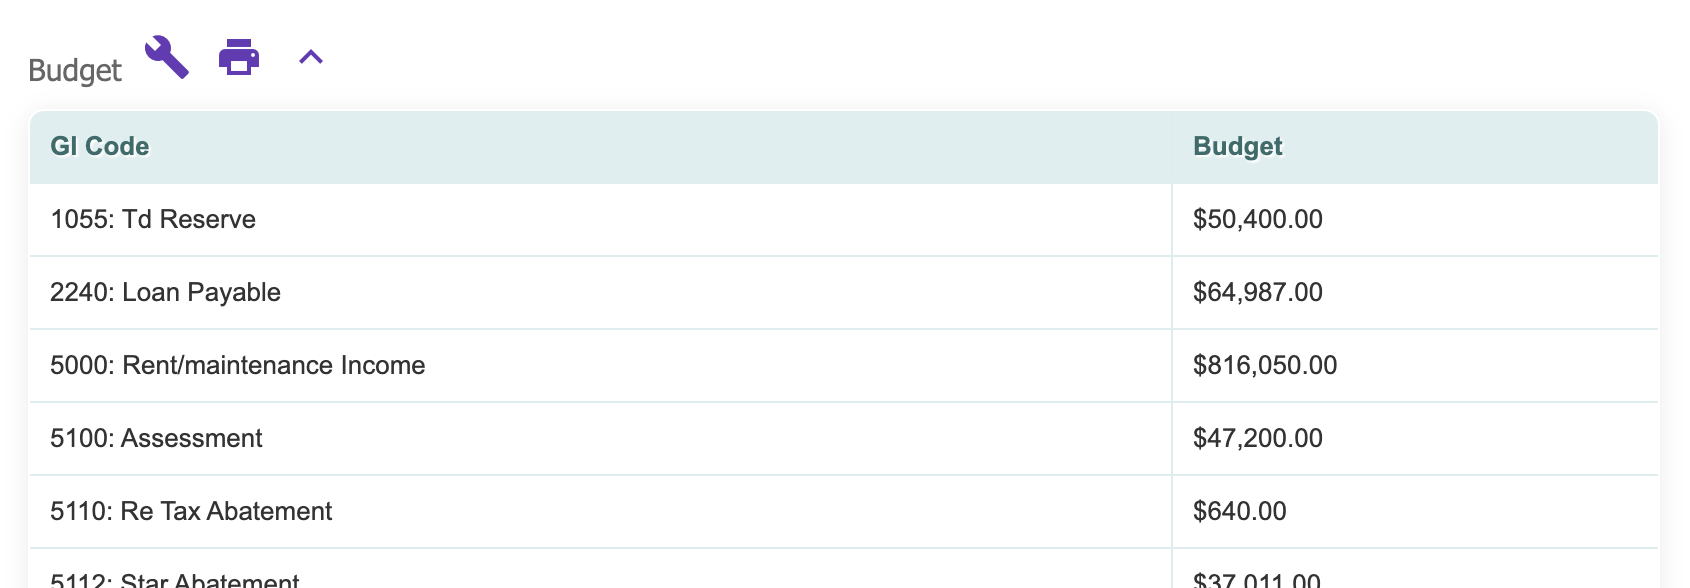
Read-only Building Budget expanded in the Edit Building screen
View the budget
To open the Building Budget screen, click the Report icon next to Budget in the Ediut Building screen. This will expand the budget for the current fiscal year, if one exists.
Edit the budget
Once expanded, a Wrench icon and Print icon become visible.
The Wrench icon will open the Edit Budget screen, where the budget can be updated.
The live budget window will update as changes are made in the edit window on the left.
A CSV can also be prepared offline and uploaded using the Upload Budget CSV button.
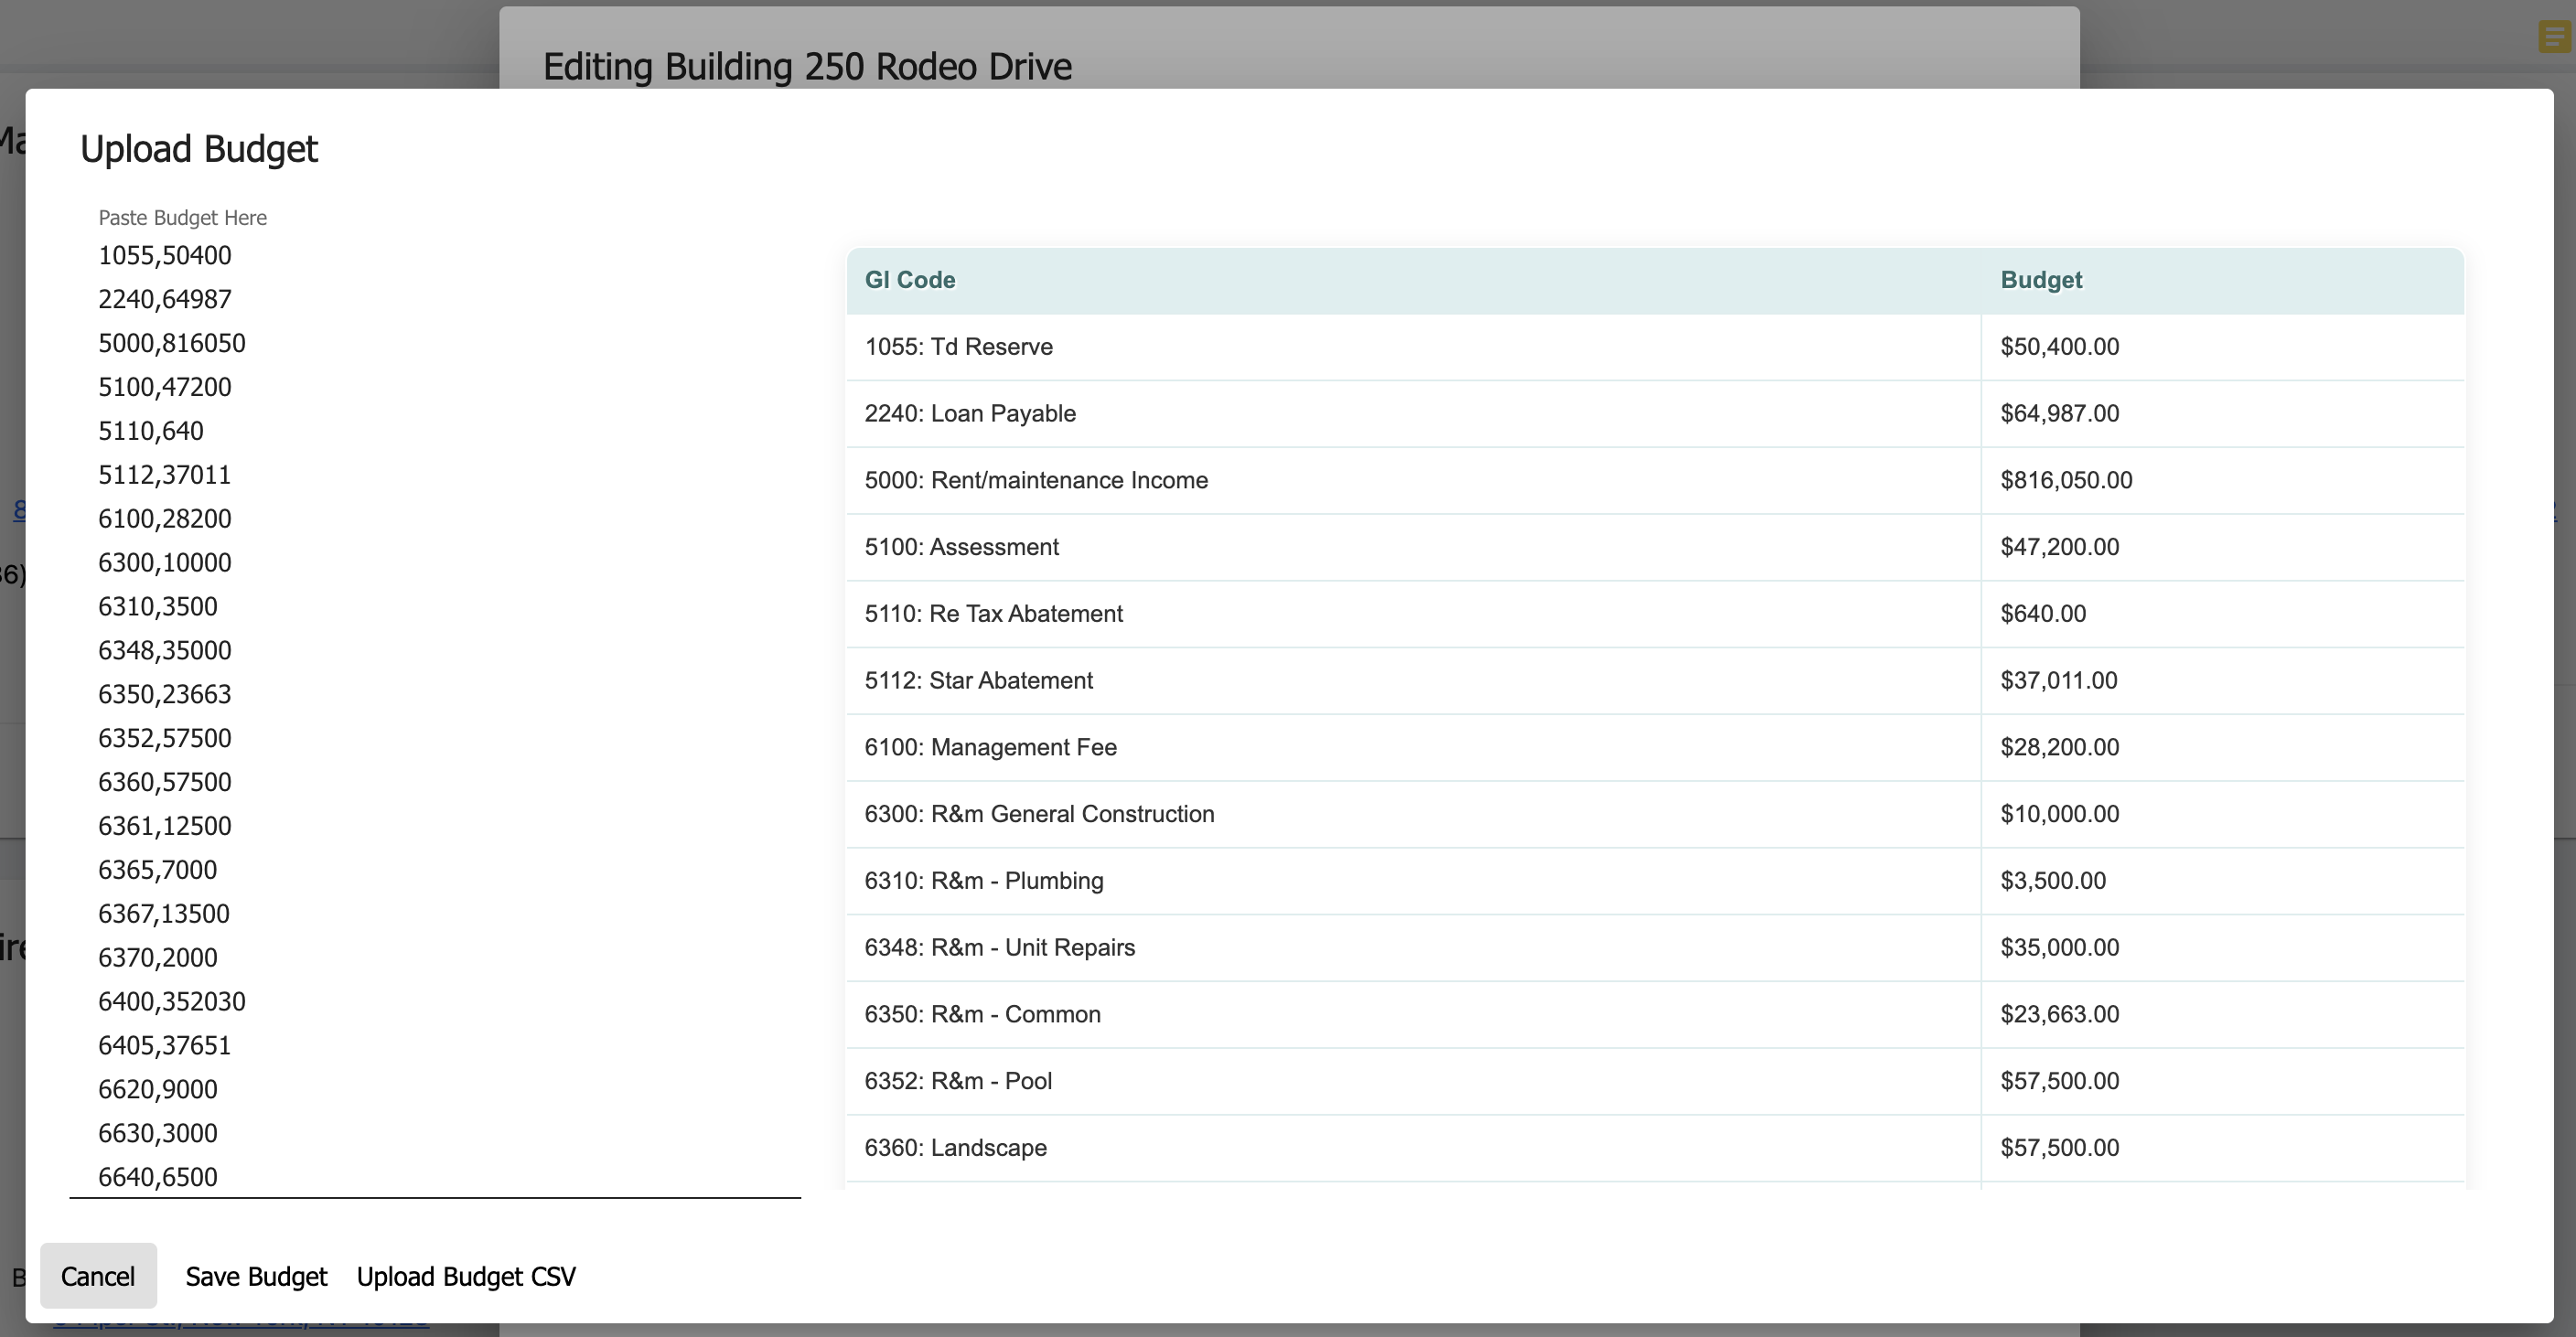
Edit Budget Screen
See the Budget & Cashflow Report in the Reports section for more information.
Building Modules
Buildings can have one or more modules enabled. Some modules incur additional charges, and these charges are billed to Management. It is up to Management to determine if these costs should be communicated and passed on to Buildings or not.
Additional charges are displayed in the confirmation screen when enabling a module.
Building Modules
See Edit Building for enabling and disabling modules.
PropMan Payments
Link Building accounts with Moov and/or Stripe to provide seamless online bill pay to Residents via The Resident Portal.
Once enabled, additional setup is required to create accounts with the 3rd party vendor. This setup is streamlined by PropMan.
Electric Bills
Split the cost of electric bills among the Residents of the Building.
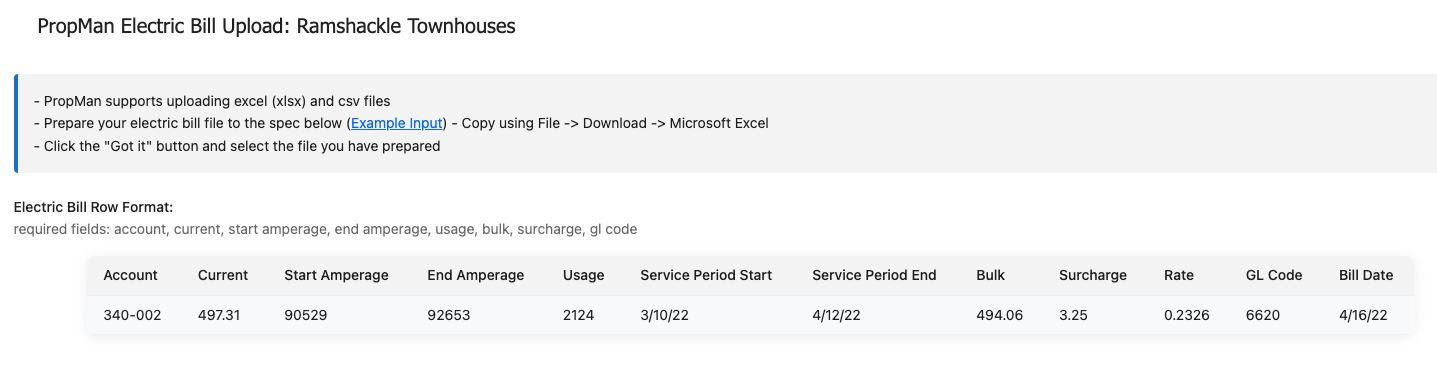
Electric Bills Module
Some electric companies charge the building as a whole rather than per unit. When this is done, often times they will provide a CSV breaking down usage per unit. This module allows for the cost of the electric bill to be split among the Residents of the Building based on their usage.
Scheduling
Shared spaces and common areas may require scheduling to enforce fair use and manage limited availability.
Scheduling Module
PropMan Scheduling allows you to setup Reservation Schedules with open and close times, slot lengths, optional time between slots, maximum bookings per slot, and an optional waiver to be signed, such as a COVID waiver.
Possible uses for Scheduling include:
Pools
Fitness Centers
Meeting Rooms
Event Spaces
Equipment and Tools
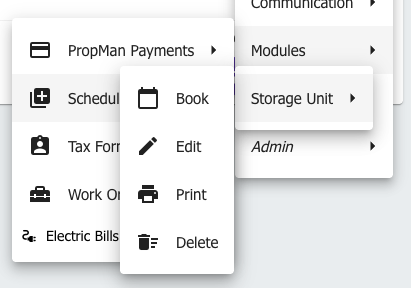
Create a Reservation Schedule
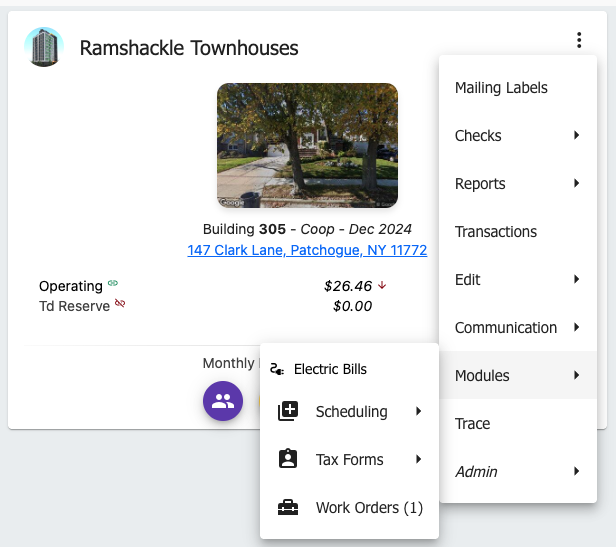
Once the module is enabled on the Edit Building screen, the Scheduling menu will appear in the Building’s dropdown menu under Modules.
Click Scheduling to create a new schedule (see below).
Click on the name of an existing schedule to open the schedule booking screen.
Hover over the name of an existing schedule to see additional actions:
Book - Open the schedule booking screen
Edit - Open the schedule for editing
Print - Print the schedule for the day
Delete - Delete the schedule
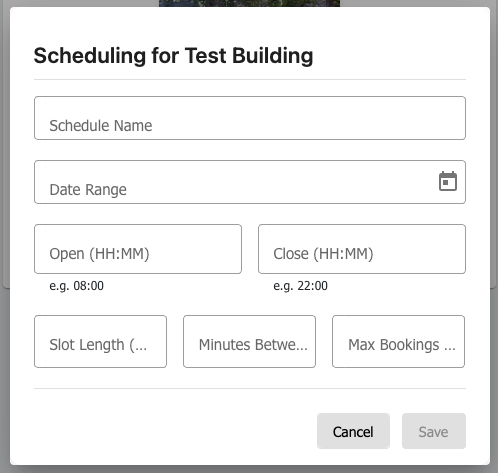
Create a new Reservation Schedule
Schedule fields:
Name - The name of the schedule
Date Range - When this schedule starts and ends
Open Time - The time of day to make the resource available
Close Time - The time of day the resource is no longer unavailable
Slot Length - The length of each slot in minutes
Time Between Slots (Optional) - The time in minutes required between each slot
Maximum Bookings per Slot - The maximum occupancy of the resource per slot
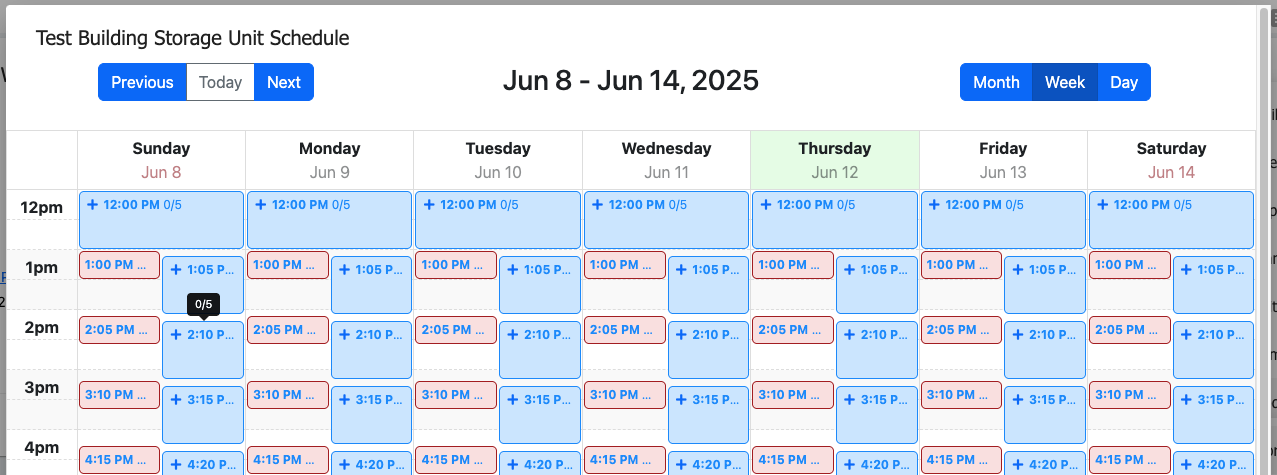
Adding Bookings
A booking reserves a slot on the schedule for a Resident plus any additional guests.
Manage Reservation Schedule
Click on the name of the existing schedule or click Book to open the schedule booking screen
The booking screen can be viewed in Month, Week, or Day modes
In all of these modes, the plus button will open the Booking Options screen
Select a resident and number of guests to book
After booking, the schedule will be updated immediately
Printing Schedules
Selecting Print from the Scheduling menu will generate a PDF of the schedule for the day.
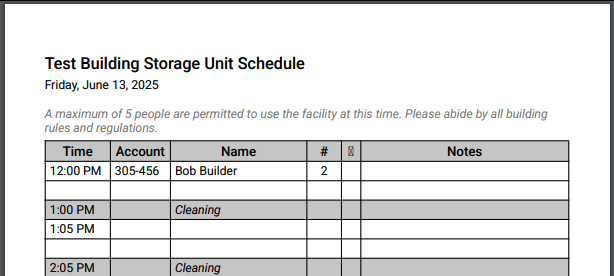
Print Schedule
The schedule PDF contains a notes section for use by whomever is monitoring the shared resource.
1098 Tax Forms
Generating 1098 Tax forms is a requirement for Coop Buildings. PropMan will generate the forms for you and make available the PDF containing copies to be printed and mailed to the Residents as well as the the ability for Residents to print their own forms.
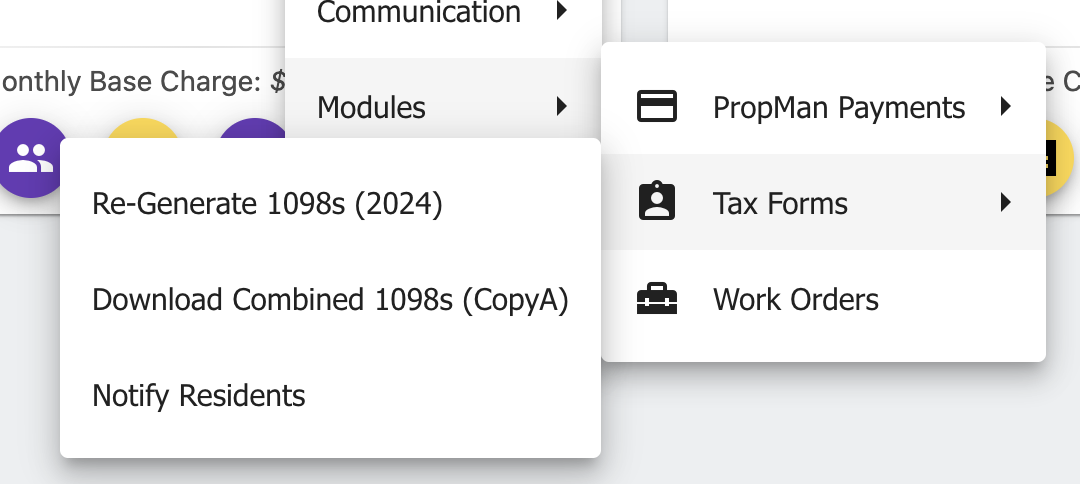
1098s Menu
Prerequisites:
The Building must be a Coop
The Building must have a valid EIN
The mortgage-related fields must be accurately set in the Edit Building screen.
Menu Options:
Generate 1098s - visible for the previous year, before the 1098s have been generated
If the 1098s have been generated, the button will be replaced with Re-Generate 1098s
Re-Generate 1098s - visible for the previous year, after the 1098s have been generated
Use when an error is discovered or 1098s have to be regenerated for any reason
Notify Residents - send an email to Residents letting them know that last year’s 1098s are available for download
Residents can print their own 1098 tax forms from the Resident Portal from the Contact Card menu.
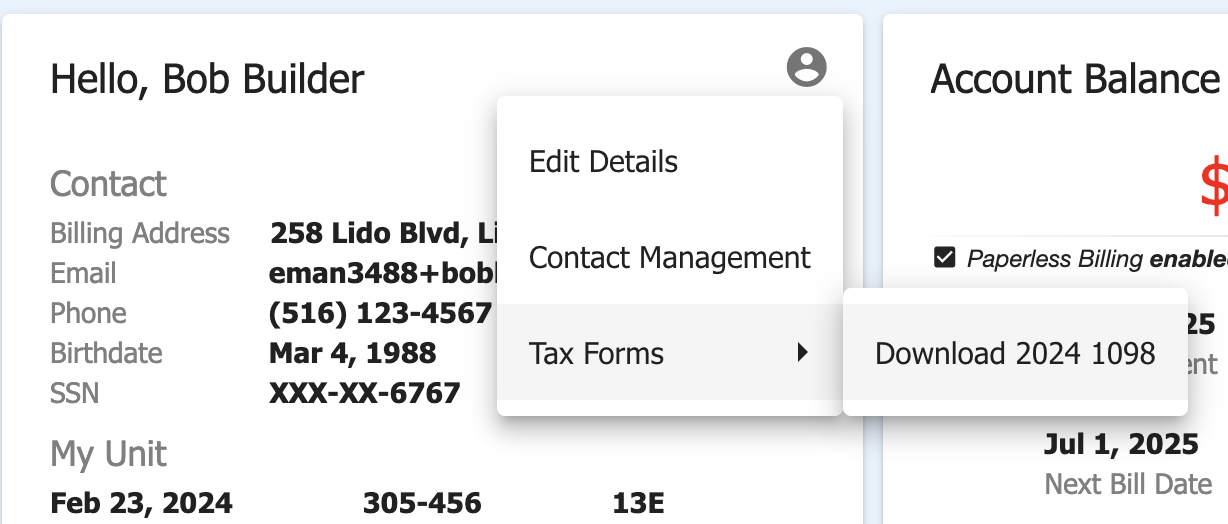
Resident Portal: Download 1098
Work Orders
Work Orders are used to track maintenance requests and repairs and facilitate communication between Residents and Management.
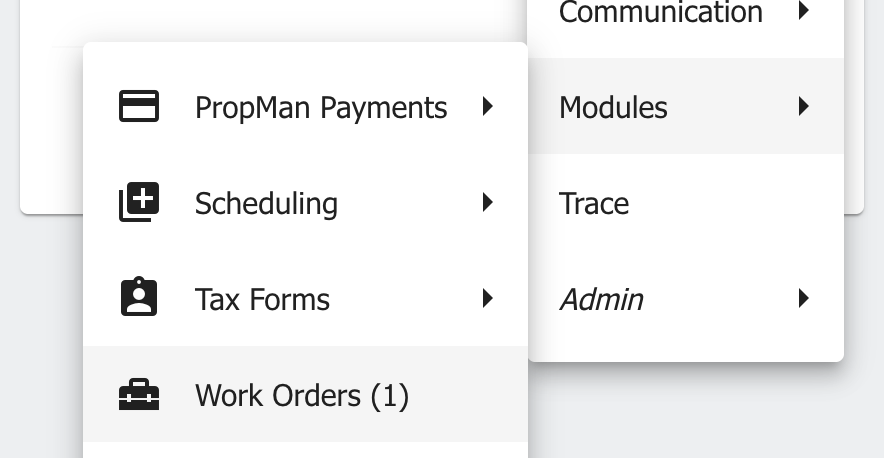
Work Orders Menu
Work Orders can be created at the Buliding-level, by Management, or at the Resident-level, by Residents or Management.
Viewing Work Orders
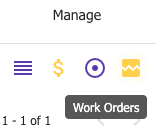
Open the Work Orders screen for a Building by clicking Work Orders in the Building, Modules dropdown menu (see above).
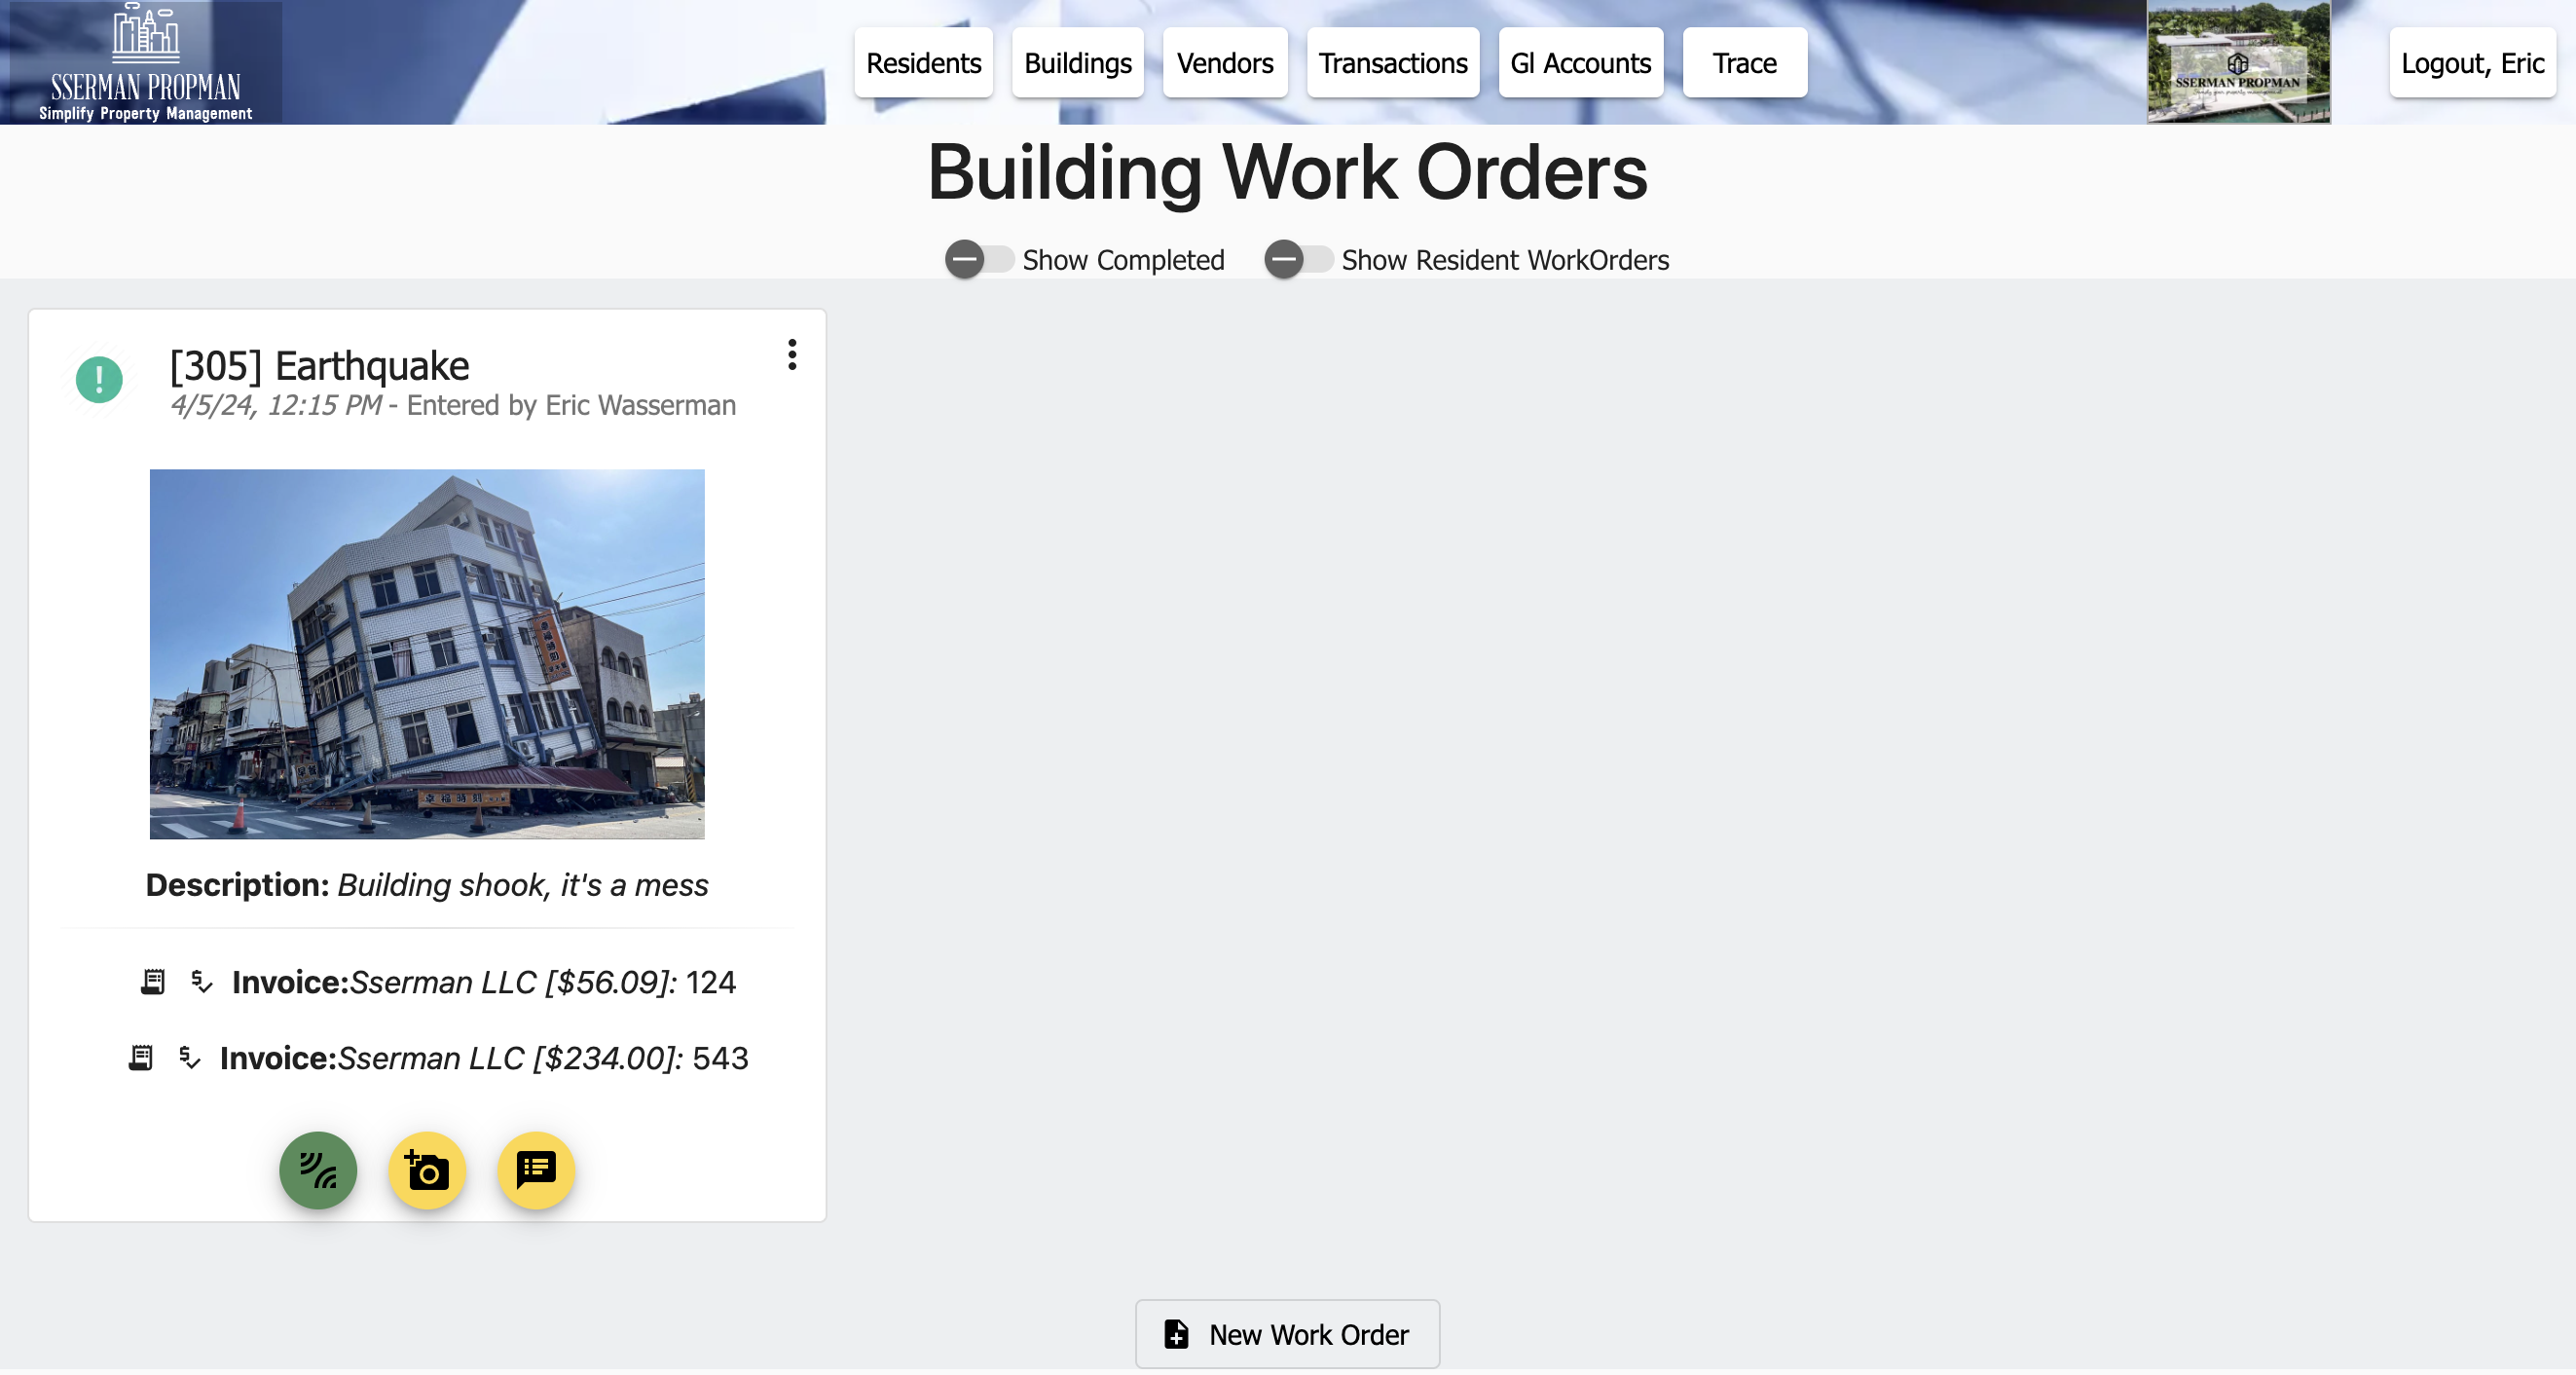
Building Work Orders Screen
Filter for historical, completed work orders, and Resident-level work orders using the sliders at the top.
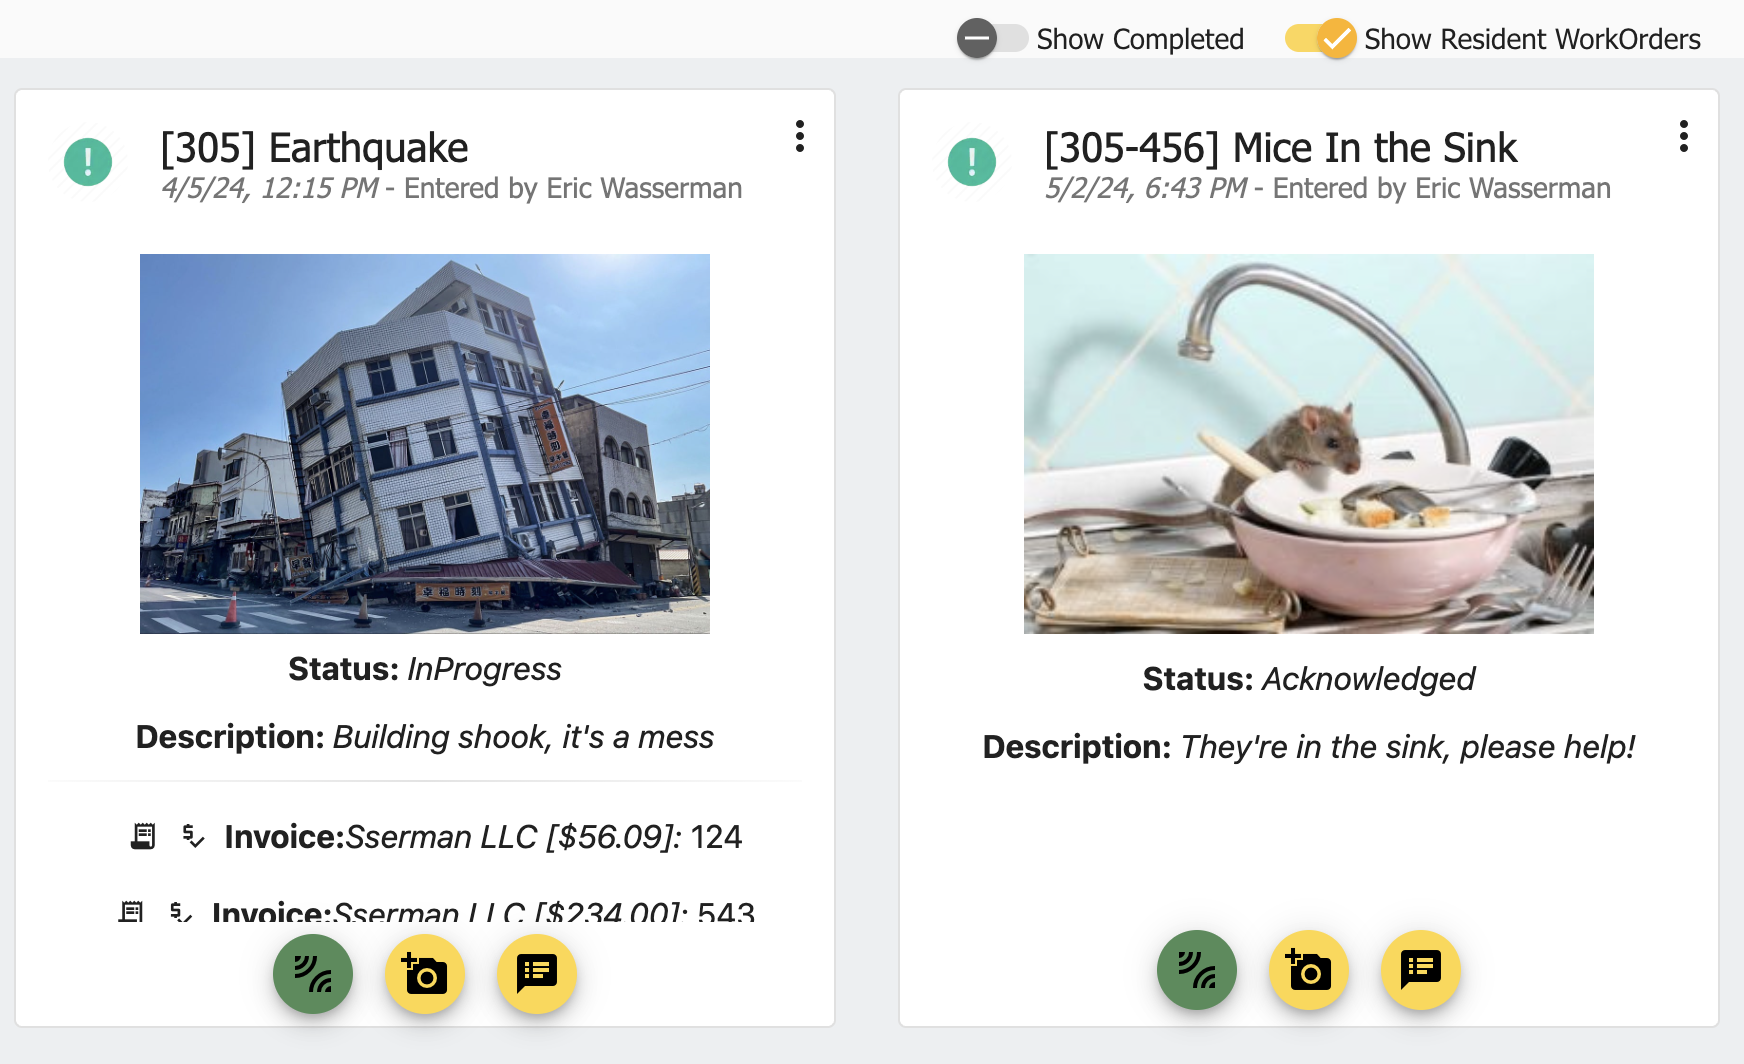
Work Orders Screen with Resident-level work orders
Open the Work Orders screen for an individual Resident by clicking Work Orders next to the Resdient on the Residents screen.
Resident Work Orders Button
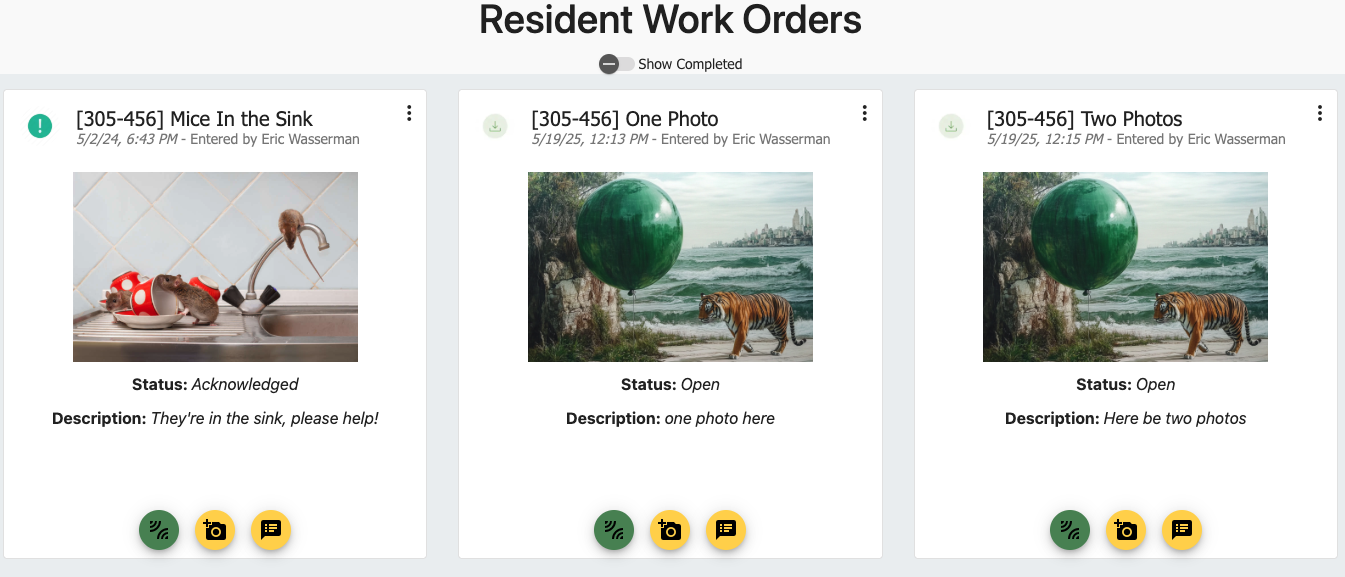
Resident Work Orders Screen
The Work Order Card
The Work Order card contains images, current status, description, a list of associated invoices and checks, and action buttons.
Clicking on the image will rotate to the next image if there are multiple.
Invoices and Checks
Associating Vendor invoices and checks with a Work Order is a great way to associate the cost of the work with the Work Order and integrate with the rest of the system.
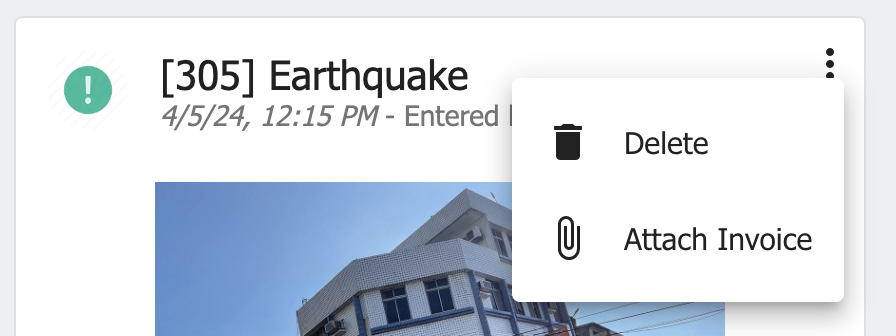
Work Order Card Menu
To view the invoice, click the receipt icon next to the invoice in the list on the Work Order card
To view the check, click the check icon next to the check in the list on the Work Order card
This will navigate to the Transactions screen with the check visible
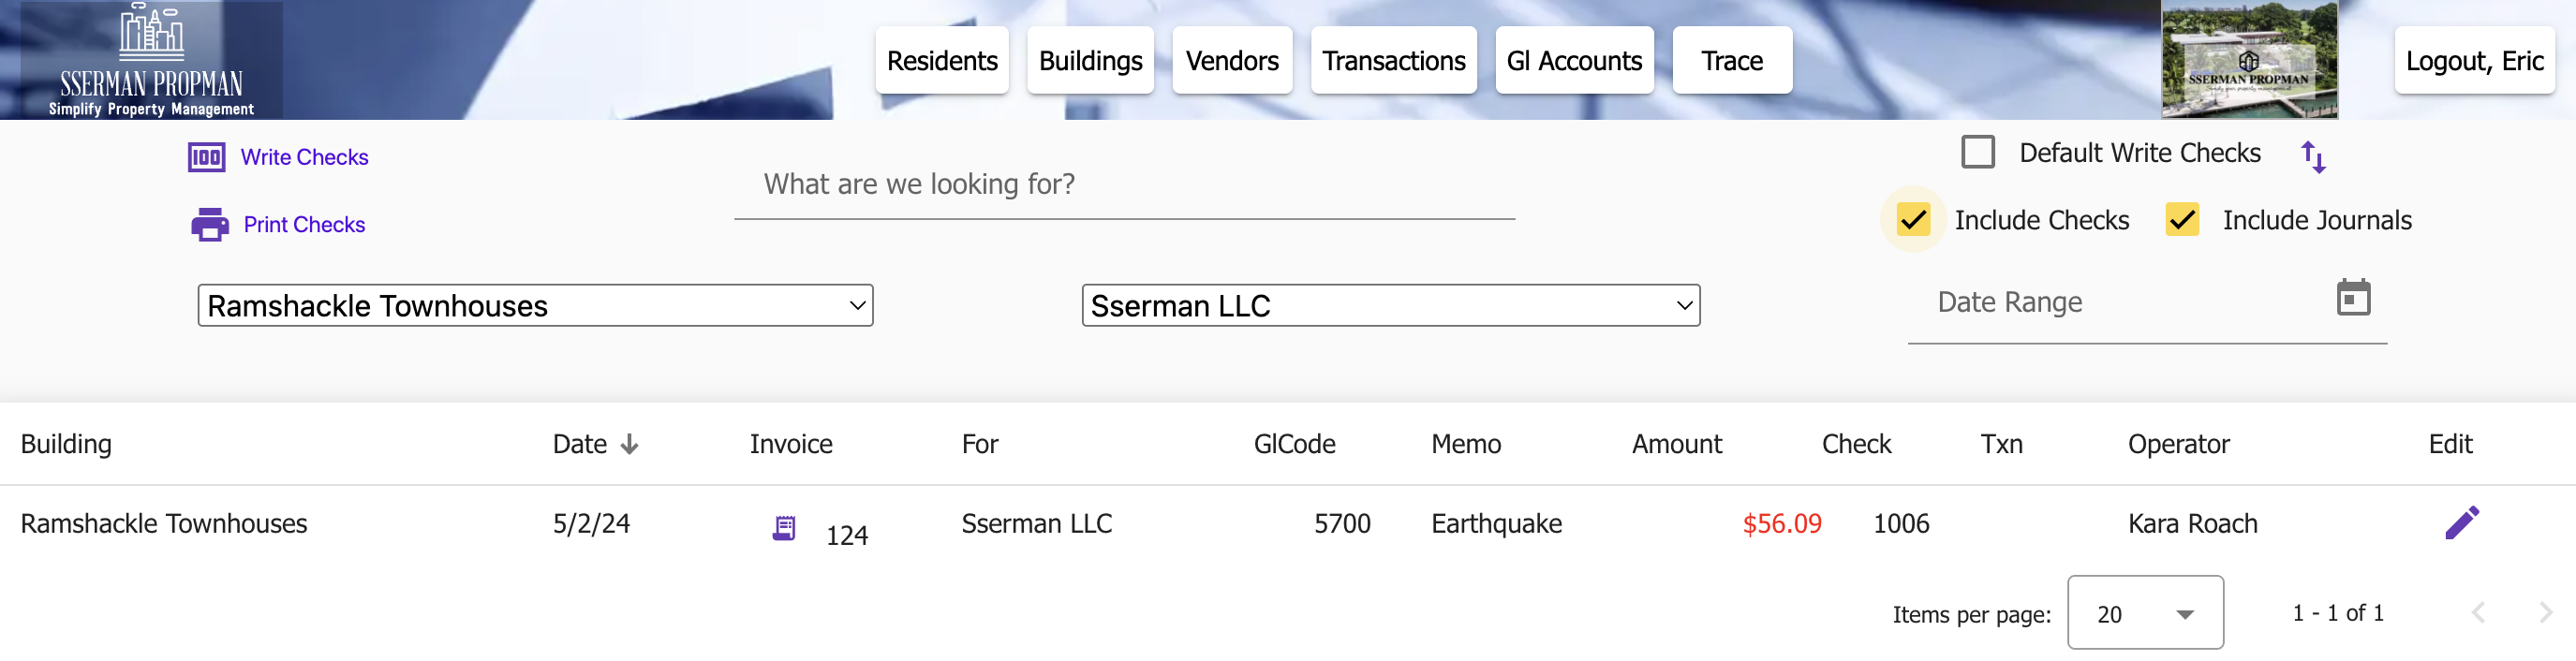
View Check
Action buttons
Update Status - Update the status of the Work Order
Possible states are: Open, In Progress, Blocked, Resolved
Upload Images - Upload images to the Work Order
Notes - View and add notes to the Work Order
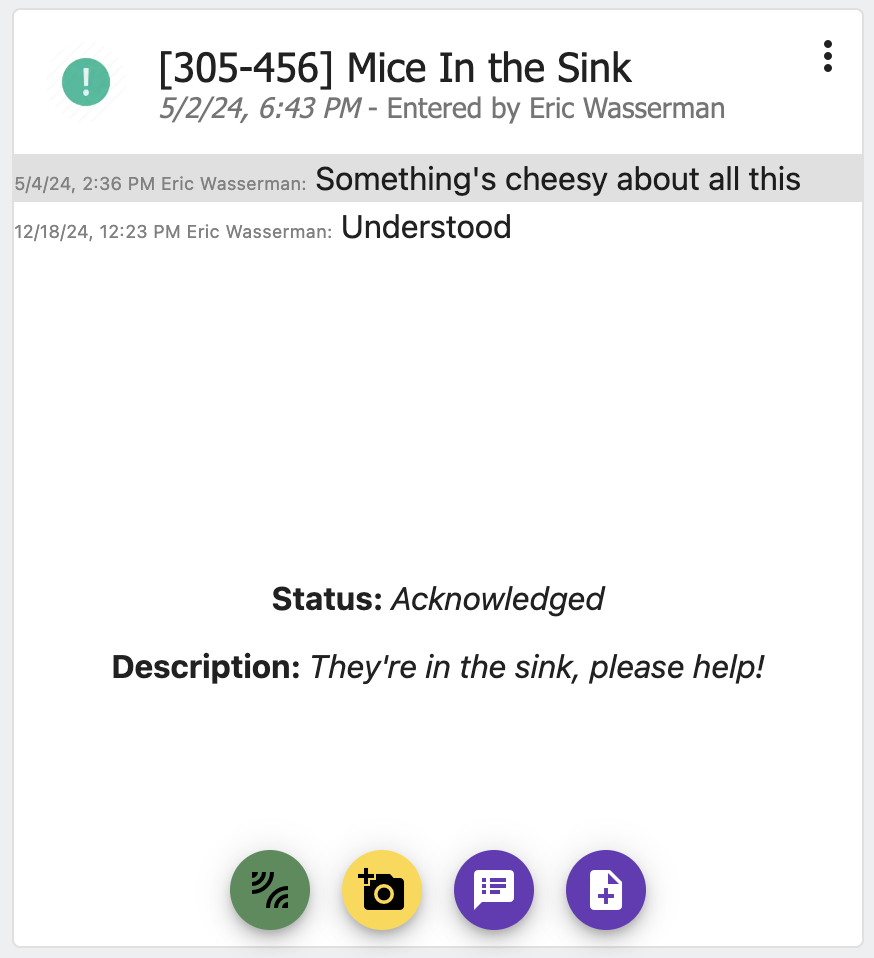
Work Order Notes
Note
Any state change, image upload, or note added will email the Resident and Management.
Two-Signature Checks
Some Boards request additional signatures on checks.
The Two-Signature Checks feature adds an extra signature line to generated Checks so they can be signed by two people.
Writing Checks
PropMan allows Property Managers to write checks to Vendors or Non-Vendor Recipients on behalf of the Building.
There are multiple ways to get to the Check Writing screen, but from the Building card, the Write Check action button is the most direct.
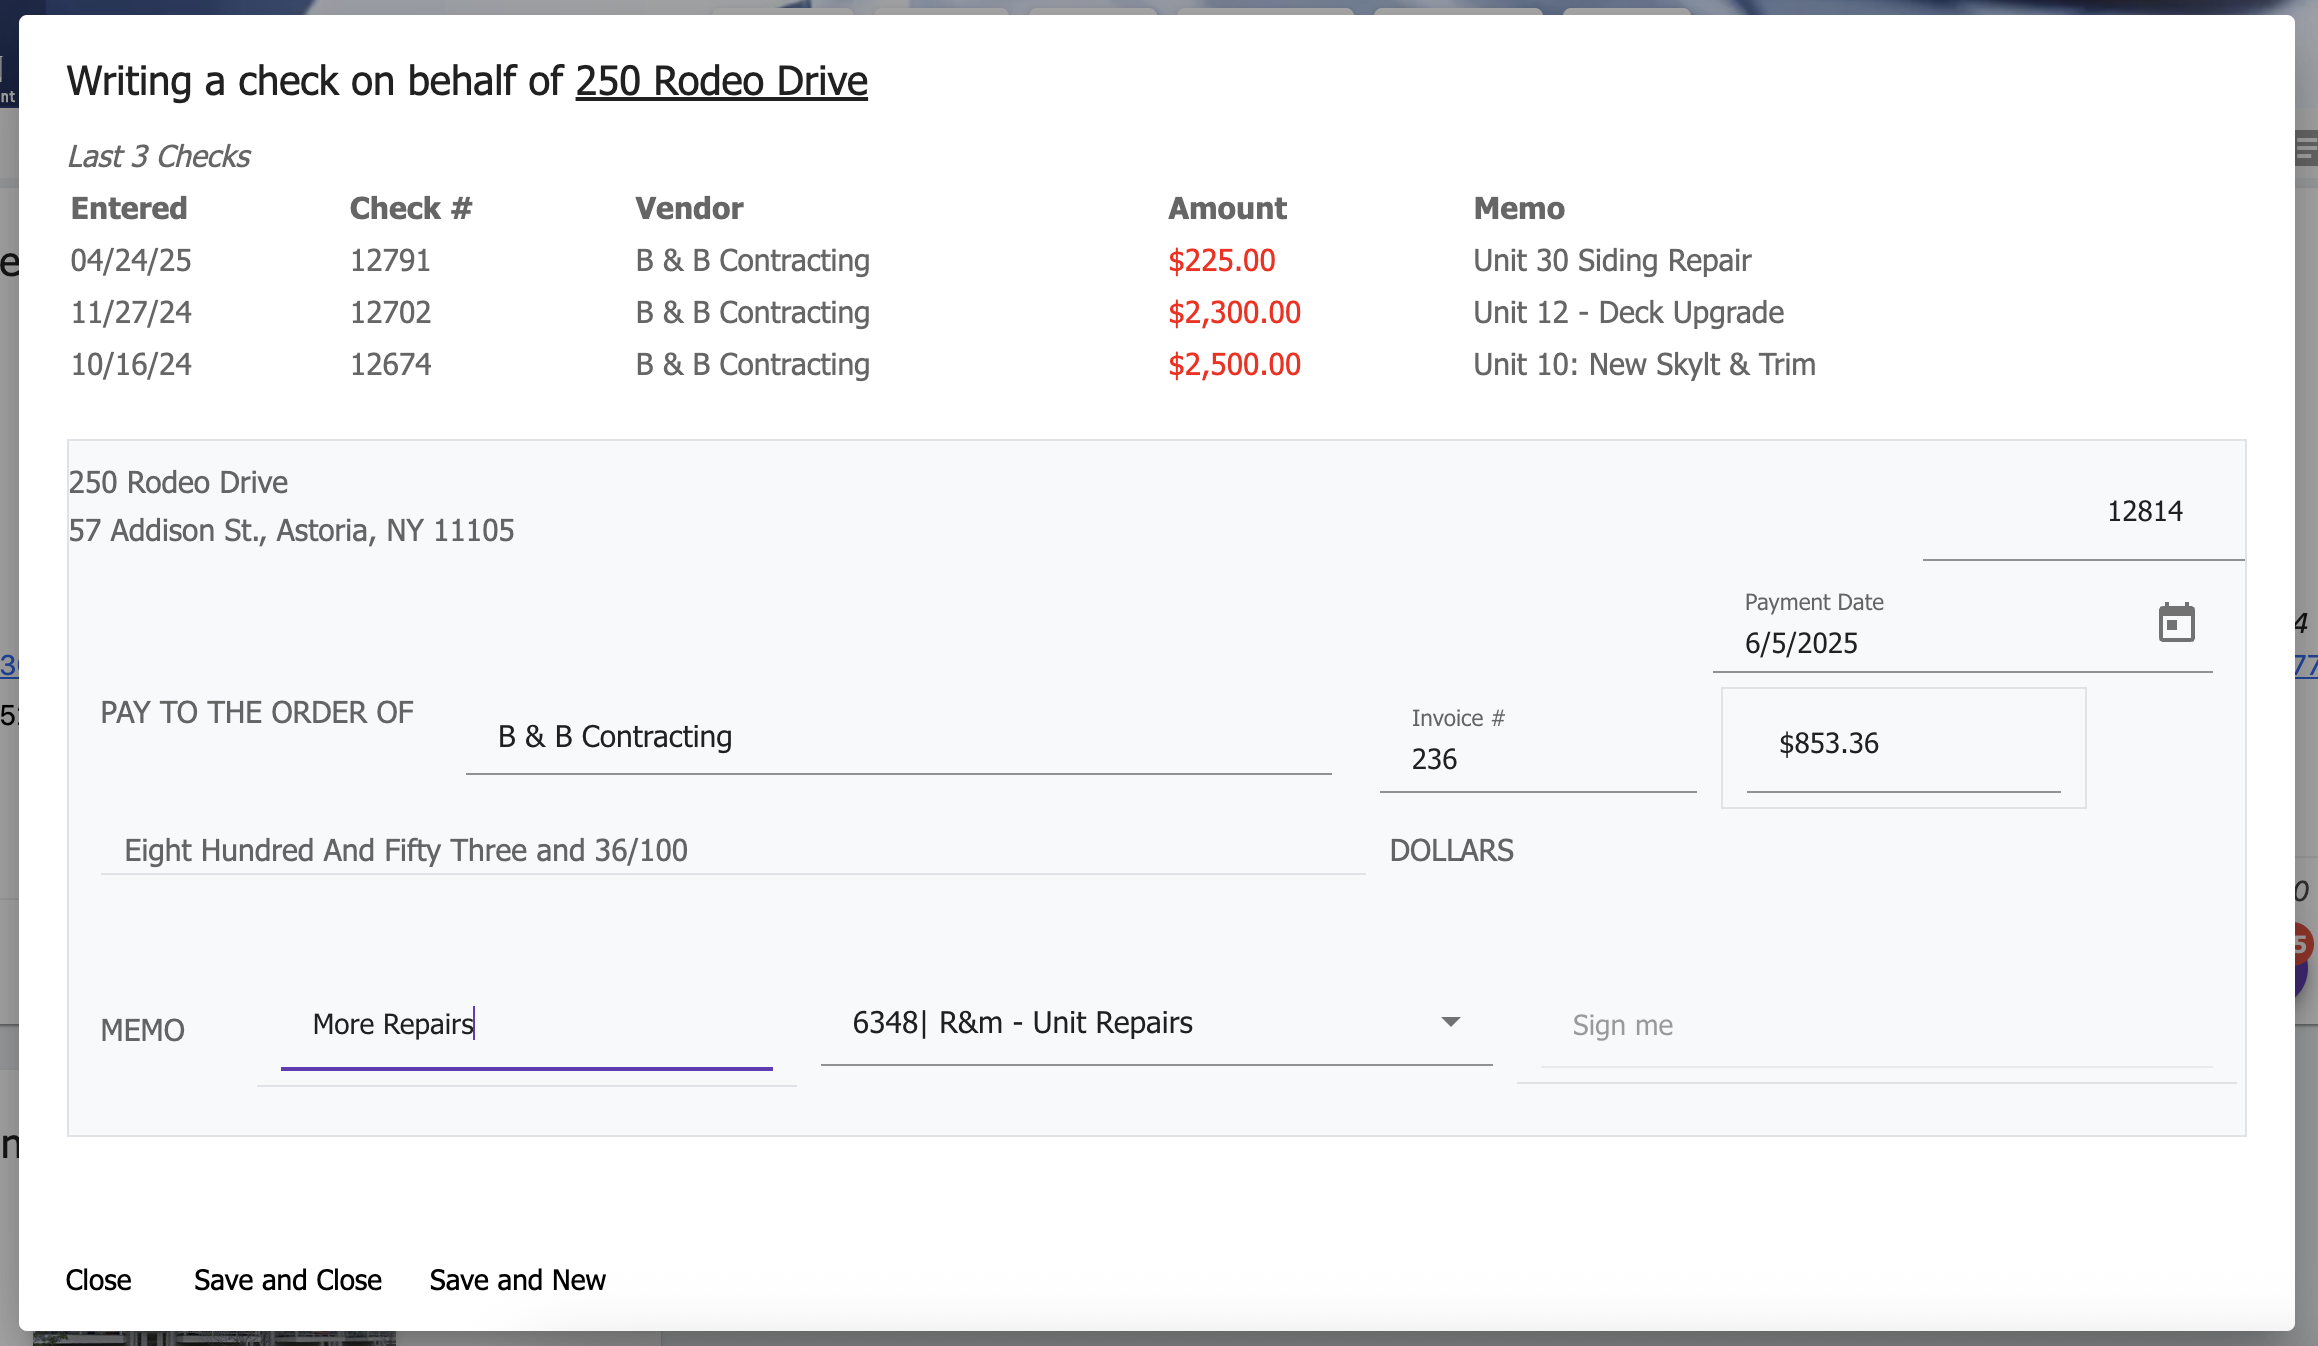
Write Check Screen
Save and Close - Save the check and close the screen
Immediately marks the check as printed and generates the PDF to print on check paper unless … - The user has Remote Print entitlement, the system will navigate the the Print Check screen
Save and New - Save the check, clear the screen in preparation for a another check
Useful for writing multiple checks in batches
After closed, the system will navigate to the Print Check screen
Running Billing
Billing is run on a monthly, quarterly, or annual basis, depending on the Building’s billing cycle.
To run billing, click the Billing button at top right of the Buildings scren.
Run Billing Buttons
Official billing is unlocked on the 15th of the month, and can a trial billing can be run at any time.
Click the purple Run Billing button to run official billing
Click the yellow Run Trial Billing button to run a trial billing
After billing is run, a 24 hour countdown timer will appear, indicating the time remaining before the Paperless Bills are emailed to the Residents.
PropMan will generate a combined PDF containing all the non-paperless bills for all Buildings. These bills should be printed on bill paper and mailed to the Residents.
Reports
PropMan provides a number of reports to help you manage your Buildings and Residents.
Most of the reports are available from the Reports menu on Building card.
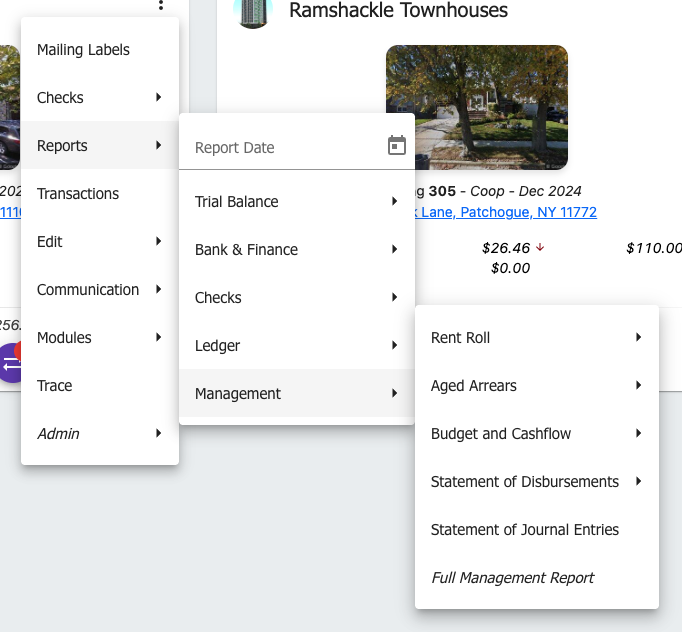
Reports Menu
See the Reports page for more information.